One important job a coach / player must be able to do is repair, reshape or replace a cue tip. I am amazed how many top snooker players I coached over the years, who could not replace a tip on their own cue.
I have written” The Perfect Cue Tip” to explain in detail what equipment is needed, and the 10 simple steps to putting on a good cue tip on your cue.
There are various brands of tips nowadays on the market from elk master, Legends, Century, Kamui Elk Pro and blue diamond used by most of the top players.
I personally only use elk master or elk master pro, I believe there a better quality cue tip, and they play better, and last longer than all of the other brands.
The tips come hard and soft in different sizes from 9mm to 12mm, but 9mm or 10mm are the most commonly used for snooker cues.
The cue tip is glued to the top of the cue, and then sanded and shaped to the desired shape, and cut down with a sharp blade to fit the size of the ferrule, this is the area the most players are afraid to do with their own cue.
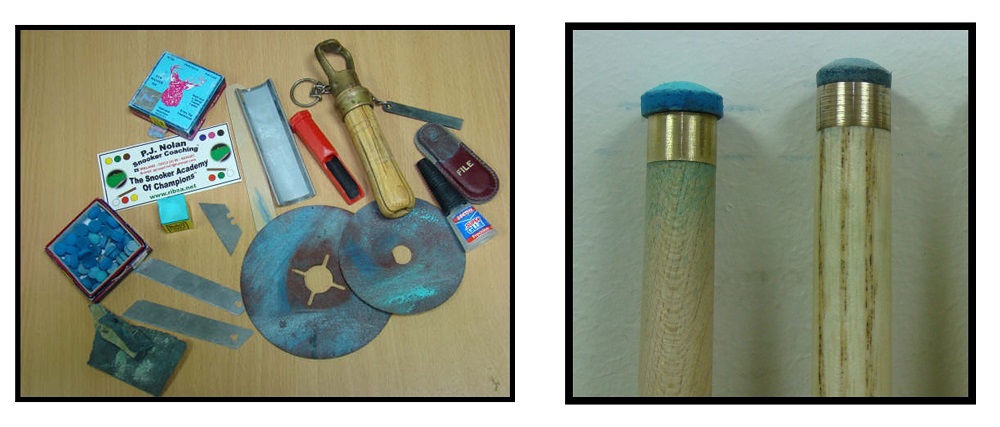
When you’re putting a new tip on a cue, you will need certain equipment, and I recommend you have the following.
- Good Quality Tips
- Tip Clamp & File
- Loctite Glue
- Blades
- Sandpaper Disk – Medium
- Sandpaper – light
- Tip File
- Chalk
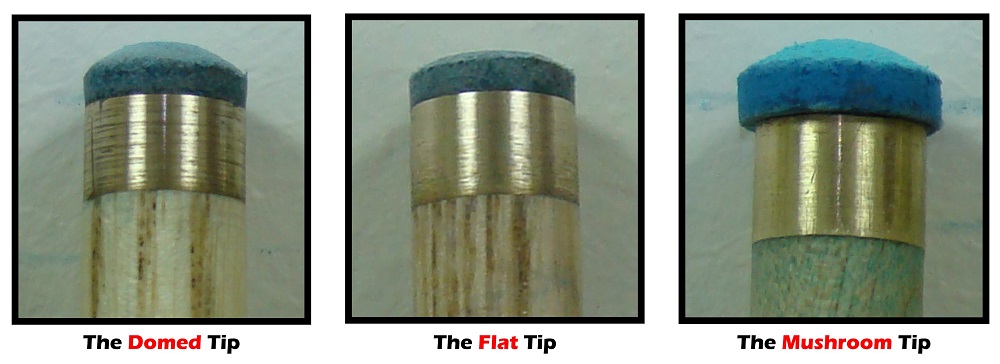
The next step is deciding what kind of tip, hard or soft, and the size, and type of tip the player wants on their cue. Some players want a big tip, and some want a small tip, and some want it flat. Some players want it domed, and some like a mushroom tip, it is all a personal choice of the player.
I recommend the tip should not be too soft, and it should be slightly domed, because this will give you the best control, when you strike the cue ball.
Preparation of the Cue & Tip
STEP 1
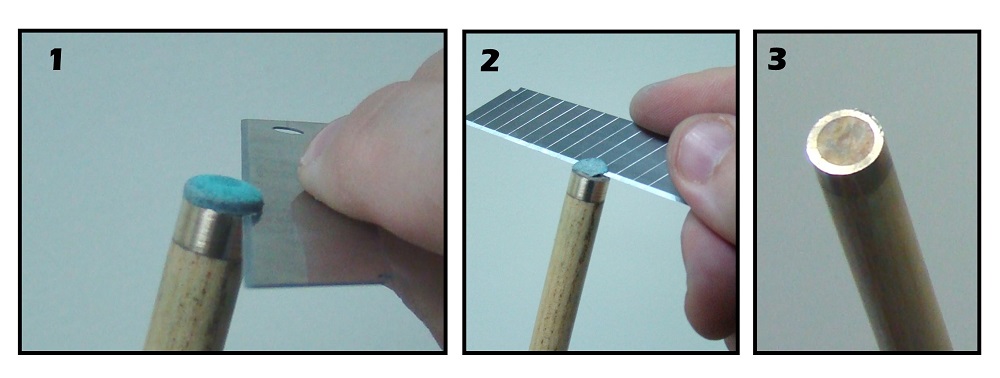
Remove the old tip from your cue, by sliding the blade carefully between the old tip and the ferrule to cut it off.
STEP 2
Next remove all of the old glue and any remains of the old tip that is left on the ferrule.
STEP 3
After the ferrule is clean and level, scale the top of the ferrule with a blade, to help the glue bond with the tip.
STEP 4
Choose the type of tip you want, and rub the bottom of tip on medium sandpaper until it is level, and you have removed the dark blue colour.
Next scale the bottom of the cue tip, with the blade, as you did with the top of the cue. Scaling the top of the cue, and the tip, maximizes the bond between the tip, glue, and the ferrule to give you the best results.
Sticking The Tip On
STEP 5
Put some glue on the top of the ferrule, and carefully place the tip in the middle of the ferrule. Be careful not to put too much glue. Make sure you place the cue tip on the ferrule as centre as possible. Now clamp the tip down tight on the ferrule for around 2 – 4 minutes.
STEP 6
The cue tip should now be stuck down tightly on the ferrule.
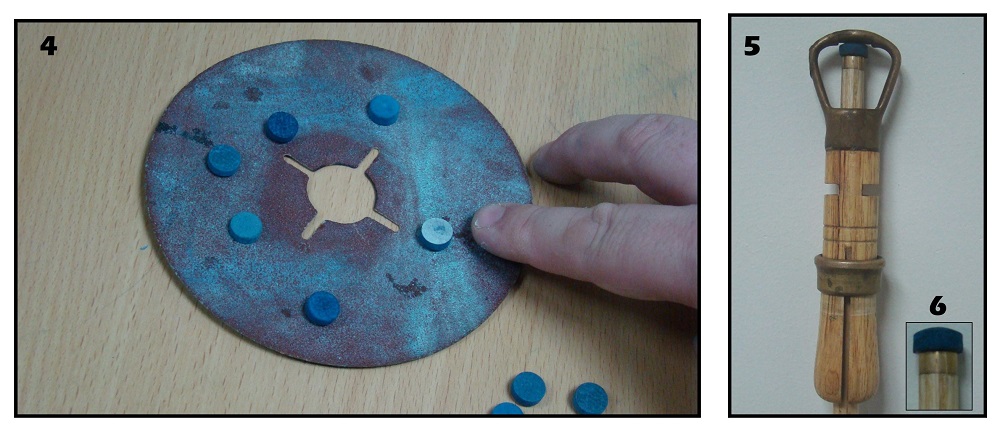
I always recommend, that whenever you have the time, you should leave the tip as big as possible when you first put it on. Then you can play it in, and shape it occasionally with sandpaper into the shape you require. This will keep all the Fibres tight, and you will have a quality tip that will last longer.
Sometimes this means that you cannot play perfect snooker straight away after you put on a new tip, this is because the tip will be slightly soft, but it will improve, and usually after 4 – 6 hrs practice it will be perfect.
If you have to replace your tip, and have a tournament the next day, and there is no time to play it in, then you have no other choice than to shape it right down until you feel you have full control the cue ball when you strike it.
Nowadays the mushroom tips are becoming very popular, and I believe they are very good for some players, especially players who have a small ferrule on their cue, because it will increase the hitting area.
If you want a mushroom style tip, then skip step 7 and go to step 8 and start sanding and shaping tip.
Cutting & Shaping The Tip
STEP 7
Remove the cue clamp and get ready to cut the tip, this is achieved by turning the cue upside down, and place it somewhere flat. Hold the blade straight, and parallel with the ferrule, and start cutting downwards while turning the cue until you have the tip, and ferrule the same size.
Remember to keep cutting down and parallel to the ferrule, or you will damage your cue or ferrule.
STEP 8
The secret to shaping the cue tip properly, is to only use downward actions while sanding the tip. To achieve an even balance in shaping the cue tip, place the bottom of the snooker cue against a wall and each time you sandpaper the tip turn the cue anti-clockwise. This helps you evenly dome the tip.
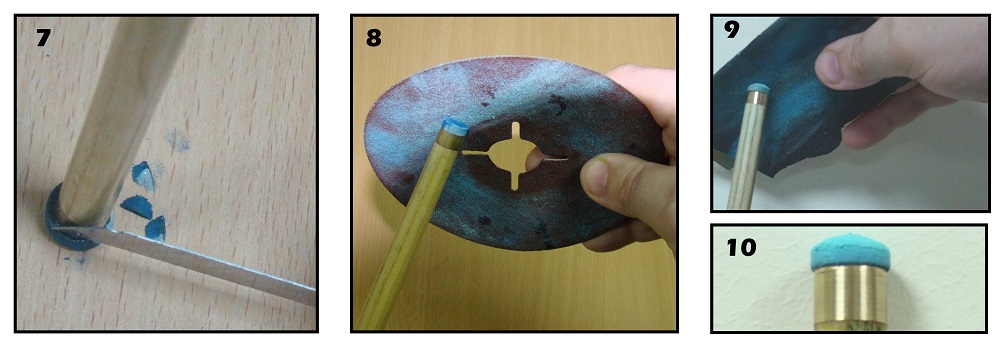
Remember the tip’s overall shape will keep changing until its played in, so do not try to shape it to your ideal size, until you have played with it.
STEP 9
When shaping the tip only use medium sandpaper, because this will not cut up the Fibres too much, because the more you cut up the tip, the softer it will be, this means it will take longer to shape the tip, but the tip will play better.
After you have shaped the tip, use very fine sandpaper, or a piece of leather to bond the sides of the tip to strengthen the sides of the tip.
STEP 10
Shine the ferrule with fine sandpaper to finish the job, and now you are ready to start practicing again.
Finally, with practice, you can improve how you replace and shape your own tip, but it is important for every player be able to replace his own tip. Always bring your cue tip equipment with you to the tournament, because you never know when you will need it.
